WCTL and Web Crossing Templates
Introduction
Standard Templates and webxStd-local.tpl
A Simple Template Customization
Troubleshooting
Resources
Next Section
In the previous section, you learned about processing forms using macros.
By now you should have a good feel as to what scripts and macros are, and some idea of tasks you can accomplish by using them.
One of the nice things about Web Crossing is that the entire user interface (with the exception of the sysop Control Panel) are just macros that you can customize. There is a macro for user login, a macro for registering as a new user, a macro for setting user preferences, a macro for how a folder or discussion looks and for how messages are presented - macros for all the user features of Web Crossing.
This means that you can customize all the features of Web Crossing completely, by replacing the standard macros with your own customized versions. And remember - since WCTL is a full-fledged programming language, you can customize not just the appearance of your Web Crossing site, but also the basic way it operates. This gives you enormous power and flexibility in building your online community.
Web Crossing refers to those macros that represent part of the standard user interface as a template; thus the name Web Crossing Template Language (WCTL).
There are more than a hundred
templates that take care of entire Web Crossing pages,
or components of pages. As new features are added to Web Crossing
the number of templates also increases.
Standard Templates and webxStd-local.tpl
All the standard templates are built-in to your Web Crossing server. Even if you do not have a webx.tpl file, as explained in the section on macros, your Web Crossing server will run just fine, because it will always default to the built-in templates.
|
Note: Actually, there is one exception to this. There is a file in your Web Crossing folder called webxextn.tpl that contains special templates with updated features and fixes in it. You should not customize this file, or remove it from your Web Crossing folder. The templates in webxextn.tpl work even when you have WCTL templates turned off in the Control Panel. |
There are two
files in your Web Crossing folder with the names webxStd-local.tpl and webxextn.tpl.
These files contains what is essentially a mirror-image of all the
default templates contained inside Web Crossing. You can copy templates
out of these files, use them as a base for your own customization,
and then add them to your webx.tpl file to have them take
effect.
|
Note: It is a common mistake for beginners to modify templates inside webxStd-local.tpl itself and then wonder why none of the changes they made seem to take effect. Remember, webxStd-local.tpl is used only if you're using the "Optimize for Localization" setting in the Localization Manager. If this setting is off, the webxStd-local.tpl file itself is not actually used by Web Crossing in any way whatsoever. We don't recommend that you make changes to either of these files directly, as they will be overwritten upon upgrade and you'll lose all your changes! Your customized templates must be inside the webx.tpl file (directly, or referenced with an Include statement) in order to take effect. |
You will
find a complete listing of all the standard templates, by category
and also in alphabetical order, in the online
sysop reference manual.
A Simple Template Customization
Let's try
our first customization with a small and very straightforward template
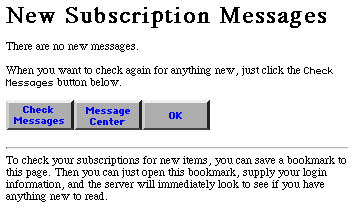
- the noNewMessages macro. This template displays the page
that is shown when you click on the Check Messages button
and there are no new messages to read. The Web Crossing built-in
template for this will produce a page that looks like figure
1.
Figure 1 - the standard noNewMessages page

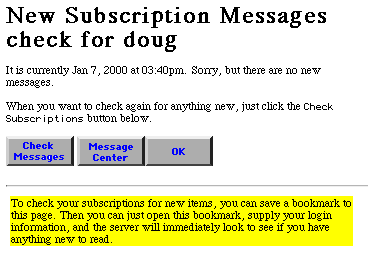
We can override this default page and make our own customized version. Let's be wild and crazy and (1) change the text, (2) personalize the page by adding the user's name, (3) throw in the current date and time and (4) add a splash of color just for fun, like in figure 2.
Figure 2 - our customized noNewMessages page

If you open up webxStd-local, you will see that the standard noNewMessages template (the one that creates the page shown in figure 1) is just the following short macro:
Note: the current version is localized, so it doesn't look exactly like this. We've left this one here because it's simpler and easier to understand.
%% macro noNewMesssages %%<HTML><HEAD><!-- Page produced by %% programName %%(r)/%% platform %%-%% version %% (%% programPromo %%) for %% siteLicensee %%--><!-- User interface (c)Copyright 1995-2000 by Web Crossing, Inc. All rights reserved.--><title>%% siteTitle %% - Read Subscriptions</title></HEAD><body %% background %%>%% preparedFor %%%% banner %%<h1>New Subscription Messages</h1><p>There are no new messages.<p>When you want to check again for anything new, just click the<tt>Check Subscriptions</tt> button below.<p><a href="%% urlBase %%38@%% certificate %%@%% location %%"><img alt=" Read Subscriptions " border=0 src="%% siteImages %%/chksubs.gif" %% pictSizeButton %%></a>%%nop%%%% if !site._extn_noBookmarks %%<a href="%% urlBase %%bookmarks@%% certificate %%@%% message_location %%"><img alt=" Message Center " border=0 src="%% siteImages%%/bookmark.gif" %% pictSizeButton %%></a>%%nop%%%% endif %%%% setPath %%<a href="%% urlBase %%14@%% certificate %%@%% location %%"><img alt=" OK " border=0 src="%% siteImages %%/ok.gif" %% pictSizeButton %%></a><p><hr>To check your subscriptions for new items, you can save a bookmark to this page.Then you can just open this bookmark, supply your login information, and the serverwill immediately look to see if you have anything new to read.%% footer %%</BODY></HTML>%% endmacro %%
Most templates follow much the same syntactical pattern, so if you get used to this one you will be able to understand the basic format for most of the standard templates. Even before we understand what all the new WCTL means, you can see that all you need do is modify the embedded HTML to achieve a certain degree of customization. Why don't we try that first so you can get a quick feeling for how easy it is to make changes in templates. Then we will go back an look through the various WCTL commands that are part of this template.
Follow these steps to customize the noNewMessages template:
(1) Create a file called nonewmessages.tpl and place the following modified noNewMessages macro in the file. The changed parts are highlighted in red.
%% macro noNewMesssages %%<HTML><HEAD><!-- Page produced by %% programName %%(r)/%% platform %%-%% version %% (%% programPromo %%) for %% siteLicensee %%--><!-- User interface (c)Copyright 1995-2000 by Web Crossing, Inc. All rights reserved.--><title>%% siteTitle %% - Read Subscriptions</title></HEAD><body %% background %%>%% preparedFor %%%% banner %%<h1>New Subscription Messages check for %% user.userName %% </h1><p>It is currently %% date %% at %% time %%. Sorry, but there are no new messages.<p>When you want to check again for anything new, just click the<tt>Check Subscriptions</tt> button below.<p><a href="%% urlBase %%38@%% certificate %%@%% location %%"><img alt=" Read Subscriptions " border=0 src="%% siteImages %%/chksubs.gif" %% pictSizeButton %%></a>%%nop%%%% if !site._extn_noBookmarks %%<a href="%% urlBase %%bookmarks@%% certificate %%@%% message_location %%"><img alt=" Message Center " border=0 src="%% siteImages%%/bookmark.gif" %% pictSizeButton %%></a>%%nop%%%% endif %%%% setPath %%<a href="%% urlBase %%14@%% certificate %%@%% location %%"><img alt=" OK " border=0 src="%% siteImages %%/ok.gif" %% pictSizeButton %%></a><p><hr><TABLE BGCOLOR="#FFFF00"><TR><TD>To check your subscriptions for new items, you can save a bookmark to this page. Then you can just open this bookmark, supply your login information, and the serverwill immediately look to see if you have anything new to read.</TD></TR></TABLE>%% footer %%</BODY></HTML>%% endmacro %%
All we changed here was the addition of %% user.userName %% to show the current user's name, and %% date %% and %% time %% to display the current time. Also, we placed the bottom text inside a table with a garish background color.
(2) Move nonewmessages.tpl over to your webx folder and modify webx.tpl to include the following line:
<!--#Include File="nonewmessages.tpl"-->For a review of how to do this, refer to the section on macros.
(3) Finally reset your file cache at the bottom of the Control Panel and check for messages! If you have no new messages, the new, customized noNewMessages page should appear, as in figure 2.
All the specific WCTL commands used are explained in detail in the online sysop reference manual. For convenience, let's go through them here as well so you can get a better feel for the components that make up a page.
The next section will explain how to create your own custom variables to add information about users or objects within Web Crossing.
I tried this example, but my no new messages page still looks the same.
Web Crossing FAQ:
Sysop docs: