Figure 1 - Web Crossing Store links
in the Control Panel

Adding, Updating & Licensing Plugins and Licensing Servers Automatically
Web Crossing 5.0 adds an exciting, powerful new way to add new functionality to your site and update existing features without having to deal with templates.
In your Control Panel there are three links of importance, shown in figure 1.
Figure 1 - Web Crossing Store links
in the Control Panel

The Shop for Plugins link will take you to the central Web Crossing Store (also referred to as the Plugins Server) where you can browse through the categories of plugins, add items to your cart, download updates to existing plugins, purchase new plugins if they are not free for your site license and even order priority support contracts and other services. Visit the Store frequently to see what's new!
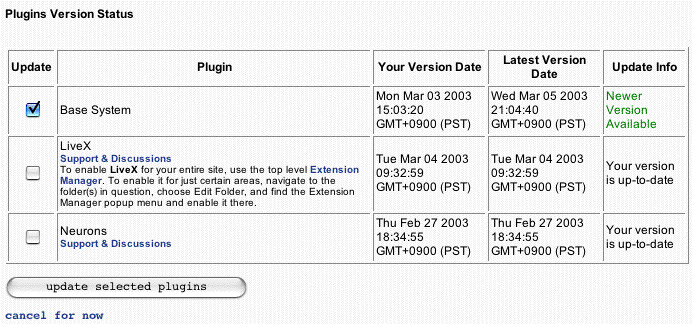
The Check for Updates link will check with the Store and report on whether plugins you installed via the Store are currently up-to-date and let you download updated versions, as shown in the example in figure 2. You should check periodically for updates of the Base System as well as extra features you have added.
Figure 2 - Checking for Updates

The Check License Order Status link connects you to the Store where you can enter an Order ID from a previous visit, check on the payment status of your order and download licenses for servers and plugins which are ready for you, as shown in figure 3.
Figure 3 - checking on an order

Note! You can also visit the Store directly. Just go to the Web Crossing home page and click on the Store tab. When you visit the Store outside your Web Crossing Control Panel you can shop for plugins, services, server licenses and hosted sites, pay for items and receive an Order ID. But you must visit through the Control Panel links in your Web Crossing server in order to actually download plugins and install licenses.